
TL;DR:
- Proper cleaning of illuminated signs is essential to maintain brightness and prevent damage, requiring careful preparation, suitable supplies, and power isolation. Regular maintenance involves dust removal, gentle cleaning with mild solutions, and immediate drying to avoid electrical and material damage. Consistent care extends sign lifespan, saving costs and ensuring effective business branding.
Your illuminated sign is one of the hardest-working assets your business owns. It draws attention around the clock, in all weathers, and it quietly collects dust, grime, and traffic pollution the entire time. Knowing how to clean illuminated signs correctly is the difference between a display that shines with crisp, appealing light and one that looks neglected at the exact moment a potential customer walks past. Get it wrong and you risk scratching the acrylic, cracking neon tubing, or letting moisture seep into electrical connectors. Get it right and regular cleaning restores sign brightness to near-new condition without a single call-out charge.
Table of Contents
How to clean illuminated signs safely: preparation first
Before any cloth touches your sign, preparation separates a safe clean from an expensive repair bill. The two non-negotiables are the right materials and proper power isolation.
Cleaning supplies you need
| Item | Purpose | What to avoid |
|---|---|---|
| Microfiber cloths (at least two) | Wiping and drying without scratching | Paper towels, rough rags, abrasive sponges |
| Distilled water | Mixing cleaning solution without mineral deposits | Tap water (leaves limescale marks) |
| Mild dish soap (2–3 drops per litre) | Loosening grime without chemical damage | Bleach, ammonia-based cleaners, glass cleaners |
| Compressed air canister | Removing loose dust before wet cleaning | Vacuum nozzles pressed directly on tubing |
| Voltage detector (optional but recommended) | Confirming power isolation before starting | No substitute for electrical safety |
Soft, lint-free microfiber cloths are not just a preference here. Paper towels and rough rags cause micro-scratches that dull the acrylic diffuser over time, reducing the very brightness you are trying to restore.
Power isolation
This step is not optional. De-energise the sign before cleaning by unplugging the power adapter for plug-in signs, or following a formal lockout/tagout (LOTO) procedure for hardwired commercial installations. The reason goes beyond basic electrical safety. When a sign is still live, any moisture that contacts the circuit can cause a short, damage LEDs, or create a shock hazard. There is a secondary benefit too: de-energising prevents dust from turning into smeared residue under a cloth because static charge on a powered sign actively attracts and holds particles.
Work in a well-lit, dry environment. If the sign is wall-mounted, clear the space beneath it so you have room to move comfortably and safely.

Pro Tip: If your sign is hardwired into a circuit and you are not certain power is fully off, use a non-contact voltage detector on the supply cable before touching anything. This costs under £20 and removes all doubt.
Step-by-step cleaning process for illuminated signs
Once your workspace is prepared and the power is confirmed off, the cleaning process itself follows a clear sequence. Skipping steps or changing the order is where most damage happens.
-
Remove loose dust with compressed air. Hold the canister upright and use short bursts to dislodge dust from the face of the sign, around lettering, and particularly in recessed areas where grime collects. Do not use a vacuum nozzle directly on neon tubing or LED strips as the suction can stress fragile connections.
-
Mix your cleaning solution. Add 2 to 3 drops of mild dish soap to a litre of distilled water and stir gently. This ratio provides enough surfactant to lift oily residue without leaving a soapy film on the acrylic.
-
Dampen your first microfiber cloth. Wring the cloth thoroughly so it is damp rather than wet. A saturated cloth introduces far more moisture than the surface needs, and any excess that tracks into joints or end caps can sit there for days.
-
Wipe the acrylic backing using single-direction strokes. Start at the top and work downward. Wipe in single-direction strokes rather than circular motions. Circular wiping traps any residual grit and drags it across the surface, creating visible swirl marks that scatter light and make the sign look worse than before you started.
-
Clean LED strips or neon tubing with a separate, lightly damp cloth. Use minimal pressure. The goal is to lift surface dust and light grime, not to scrub. Work along the length of the tubing rather than across it.
-
Avoid the connectors and end caps while wet. Moisture infiltration around end caps and electrical connectors is one of the most common hidden causes of early sign failure. Use compressed air rather than a damp cloth in these areas. If there is visible grime around a connector, use the very tip of a barely-damp cloth and dry immediately.
-
Dry the entire surface with a clean, dry microfiber cloth. Do not leave the sign to air dry. Residual moisture can wick into joints, and water marks on acrylic are harder to remove than the original grime.
One rule that professionals apply without exception: never spray water or cleaner directly onto the sign. Always apply any solution to your cloth first. Spraying introduces unpredictable liquid paths that reach connectors, driver units, and LED channels. The cloth acts as a controlled delivery method for moisture.
Pro Tip: Use gentle, consistent pressure throughout. If you find yourself pressing harder to shift a mark, stop and re-dampen the cloth rather than increasing force. Stubborn residue on acrylic responds to dwell time, not pressure.
For detailed guidance specific to different sign types, the Promosigns resource on illuminated sign maintenance is worth reviewing before you start on older or more complex installations.
Troubleshooting problems after cleaning
Even a careful clean can reveal or trigger issues you had not noticed before. Here is how to read the signs and respond correctly.
Flickering or dimming after cleaning
If your sign flickers when you restore power, do not assume the worst. The most likely cause is minor moisture ingress near a connector rather than a failed LED or driver unit. If dimming or flickering appears after cleaning, unplug the sign immediately and allow it to dry in a warm room for a full 24 hours before reconnecting. Forced heat from a hairdryer near electrical components is not recommended. Patience is the correct tool here.
If flickering persists after 24 hours of drying, the issue is more likely a loose connection or a failing power adapter rather than moisture. Check that all connector points are fully seated and that the power cable is undamaged.
Sticky or cloudy residue on acrylic
This is almost always the result of using the wrong cleaner. Harsh chemicals damage acrylic and neon tubes, causing crazing, cloudiness, or a sticky film that attracts more dust than the surface before you cleaned it. If you have inherited a sign with existing chemical damage, a dedicated acrylic cleaner and polish can improve appearance, but deeply crazed acrylic cannot be fully restored.
Common mistakes versus recommended practices
| What to avoid | What to do instead |
|---|---|
| Spraying liquid directly onto the sign | Apply cleaner to cloth first |
| Using circular wiping motions | Use single-direction strokes only |
| Cleaning while the sign is still powered | Always de-energise and confirm with a voltage detector |
| Using glass cleaner, bleach, or ammonia | Use distilled water with a drop of mild dish soap |
| Wiping connectors and end caps with a wet cloth | Use compressed air; barely damp cloth tip if needed |
| Air-drying after cleaning | Dry immediately with a second dry microfiber cloth |
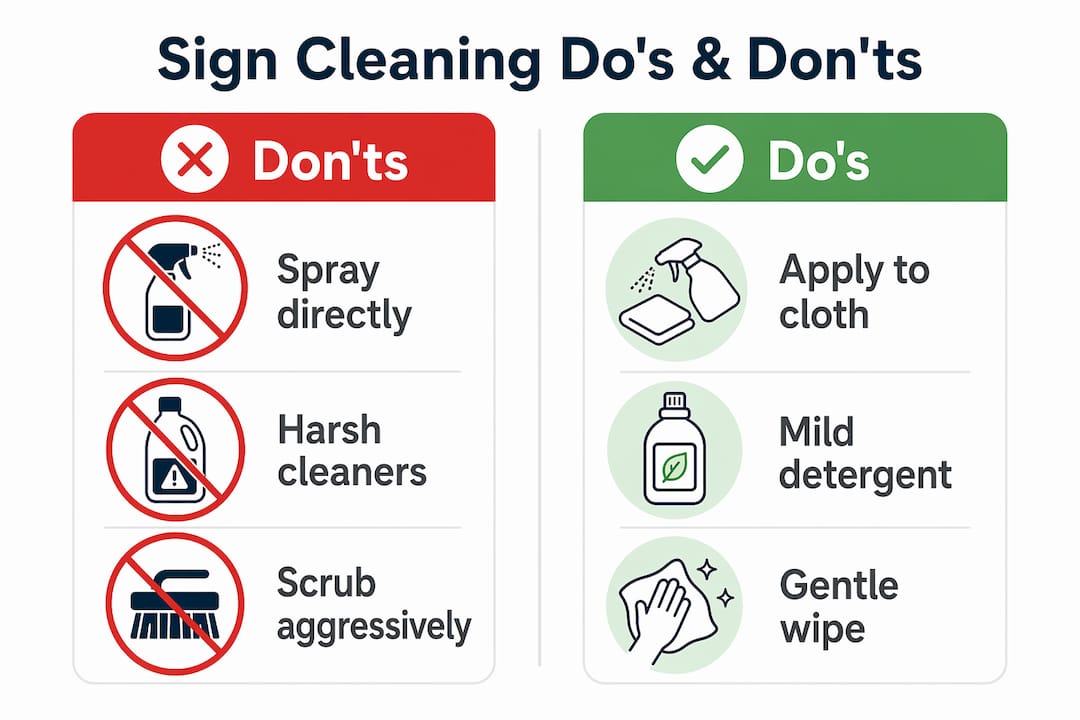
The pattern here is consistent. Most problems trace back to moisture in the wrong place or the wrong cleaning product. Both are entirely avoidable with the right preparation.
For guidance on protecting signs against environmental moisture more broadly, the Promosigns article on weatherproof signage solutions covers the risks in detail.
Ongoing maintenance and cleaning schedule
A single thorough clean makes a visible difference, but the goal is sustained brightness over the life of your sign. That requires a maintenance schedule rather than an occasional response to visible dirt.
- Weekly: A quick visual check. Look for visible dust accumulation, any new physical damage, and whether the brightness appears consistent across the sign face. This takes under two minutes and catches problems before they worsen.
- Monthly: A light dust using a dry microfiber cloth or compressed air to remove surface particles before they bond to the acrylic. This keeps the interval between deep cleans longer and reduces the risk of scratching when you do clean properly.
- Every one to three months: A full clean following the step-by-step process above. Monthly inspections and cleaning every one to three months are considered best practice for maintaining LED sign brightness and extending service life. Businesses in high-traffic or high-pollution environments, such as roadside retail or kitchens, should lean toward the more frequent end of that range.
- Annually: A professional inspection of electrical connections, seals, and mounting hardware. Signs in exposed outdoor positions are particularly susceptible to seal degradation, which can allow water ingress independent of cleaning activity.
Document your maintenance. A simple log with the date, what was cleaned, and any observations takes moments to keep and can be genuinely useful if a fault develops and you need to demonstrate due care, or if you are comparing sign performance across multiple premises.
Pro Tip: Keep your sign dry between cleans as well. If your sign is in a location where condensation forms, such as near a kitchen extraction point or in a cool interior space, consider whether the positioning is contributing to premature deterioration. Relocating the driver unit away from direct moisture sources can add years to your sign’s life.
Promosigns has published a detailed guide on shop sign maintenance tips that covers the full scope of care for different sign types across London businesses, which is worth bookmarking alongside your maintenance log.
My perspective on sign cleaning and business investment
I’ve spoken with hundreds of business owners over the years, and the same pattern comes up repeatedly. Cleaning the sign is always on the list, but it rarely makes the top of it. The assumption is that a dim or grimy sign is a sign that needs replacing, not cleaning.
That assumption is almost always wrong. What I’ve seen time and again is that a careful clean, done correctly, transforms the appearance of a sign immediately. The brightness returns, the branding looks crisp again, and the sign that was about to be written off as end-of-life carries on working for another two or three years. That is a meaningful return on about 30 minutes of effort and virtually no cost.
The misconception I find most costly is the idea that household cleaning products are a safe choice. Glass cleaners damage neon and acrylic in ways that are permanent and often not visible until weeks after the damage is done. Business owners reach for what is under the counter, cause crazing or cloudiness, and then genuinely believe the sign has failed. It has not. It has been damaged.
The other hidden risk is moisture ingress. Most sign failures I’ve encountered that look like electrical faults trace back to repeated cleaning with too-wet cloths or direct spraying over months or years. The fix is always the same: dry cloth, gentle pressure, never spray directly. That is not complex advice, but following it consistently is what separates signs that last a decade from ones that fail in three years.
— Promo
Keep your signs working harder for your business
At Promosigns, we understand that your signage is an investment in your brand’s visibility, and that investment is worth protecting with the right care.
Whether you need guidance on caring for your current illuminated signs, are considering LED shop signs for a new or refurbished premises, or want to explore the full advantages of illuminated signage for your business, Promosigns is here to help. We design, manufacture, and install bespoke illuminated signs for retail, hospitality, and corporate clients across London, Essex, and Kent. If your current sign has deteriorated beyond what cleaning can restore, our team can advise on cost-effective replacement or refurbishment options tailored to your premises and budget. Get in touch with the Promosigns team for professional advice.
FAQ
How often should I clean my illuminated sign?
Light dusting monthly and a thorough clean every one to three months is recommended for most business environments. High-traffic or high-pollution locations benefit from more frequent attention.
What is the safest cleaner to use on illuminated signs?
A solution of two to three drops of mild dish soap in a litre of distilled water, applied with a damp microfiber cloth, is the safest option. Avoid glass cleaners, bleach, and ammonia, which permanently damage acrylic and neon tubing.
Can I clean my illuminated sign while it is switched on?
No. Always unplug or isolate power before cleaning. A live sign presents an electrical shock hazard and static charge on the surface actively attracts dust into the cleaning cloth.
Why is my sign flickering after I cleaned it?
Flickering after cleaning usually indicates minor moisture ingress near a connector. Unplug the sign and allow it to dry in a warm room for 24 hours before restoring power. If flickering continues after drying, check that all connectors are fully seated.
What should I do if my sign has cloudy acrylic after cleaning?
Cloudiness on acrylic is typically caused by using a harsh chemical cleaner. A dedicated acrylic cleaner and polish can improve mild cases, but deep crazing cannot be fully reversed. Prevent the issue entirely by avoiding any cleaner not specifically approved for acrylic surfaces.
Recommended
- Maintenance for Illuminated Signage: A Step-by-Step Guide – PromoSigns.co.uk
- How to Maintain Illuminated Signs for Lasting Brilliance – PromoSigns.co.uk
- Essential Maintenance for Illuminated Signs: UK Guide
- Smart Guide to Servicing Illuminated Signs in London – PromoSigns.co.uk
